Blog Simple Page Editing Tool
runing with MarkDown!
Write blog posts the simple way with markdown — bye-bye, html!

NW' Blog Article Management Tool
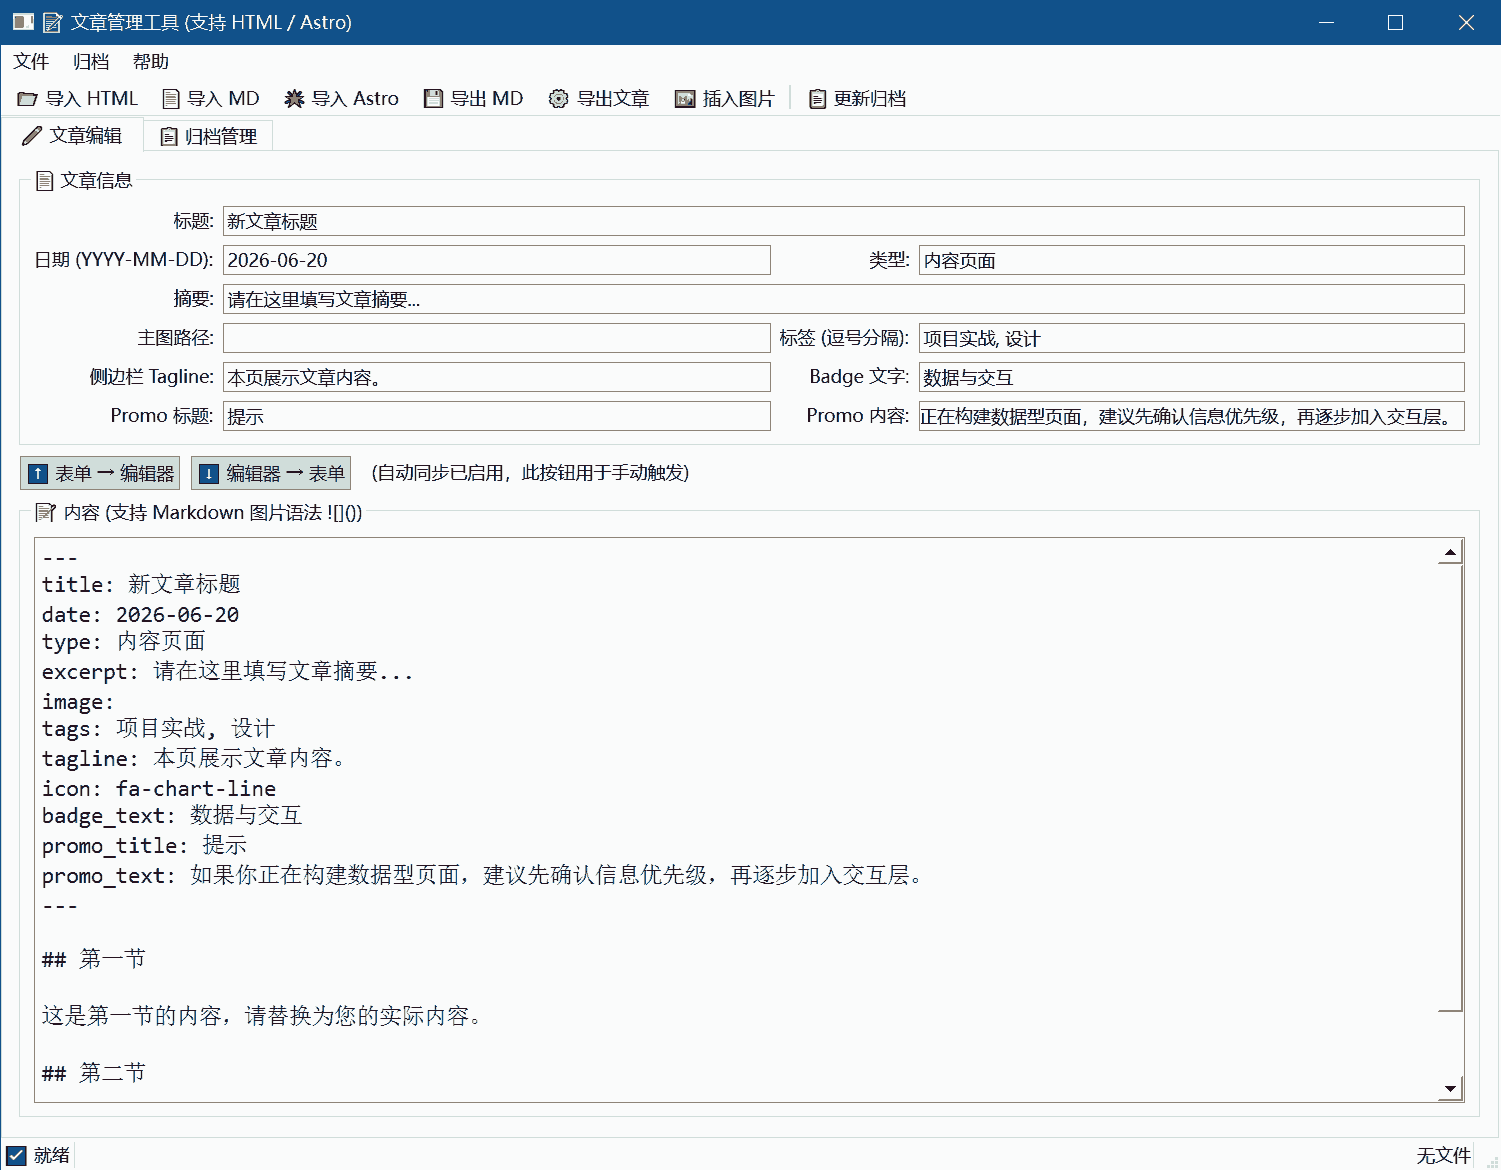
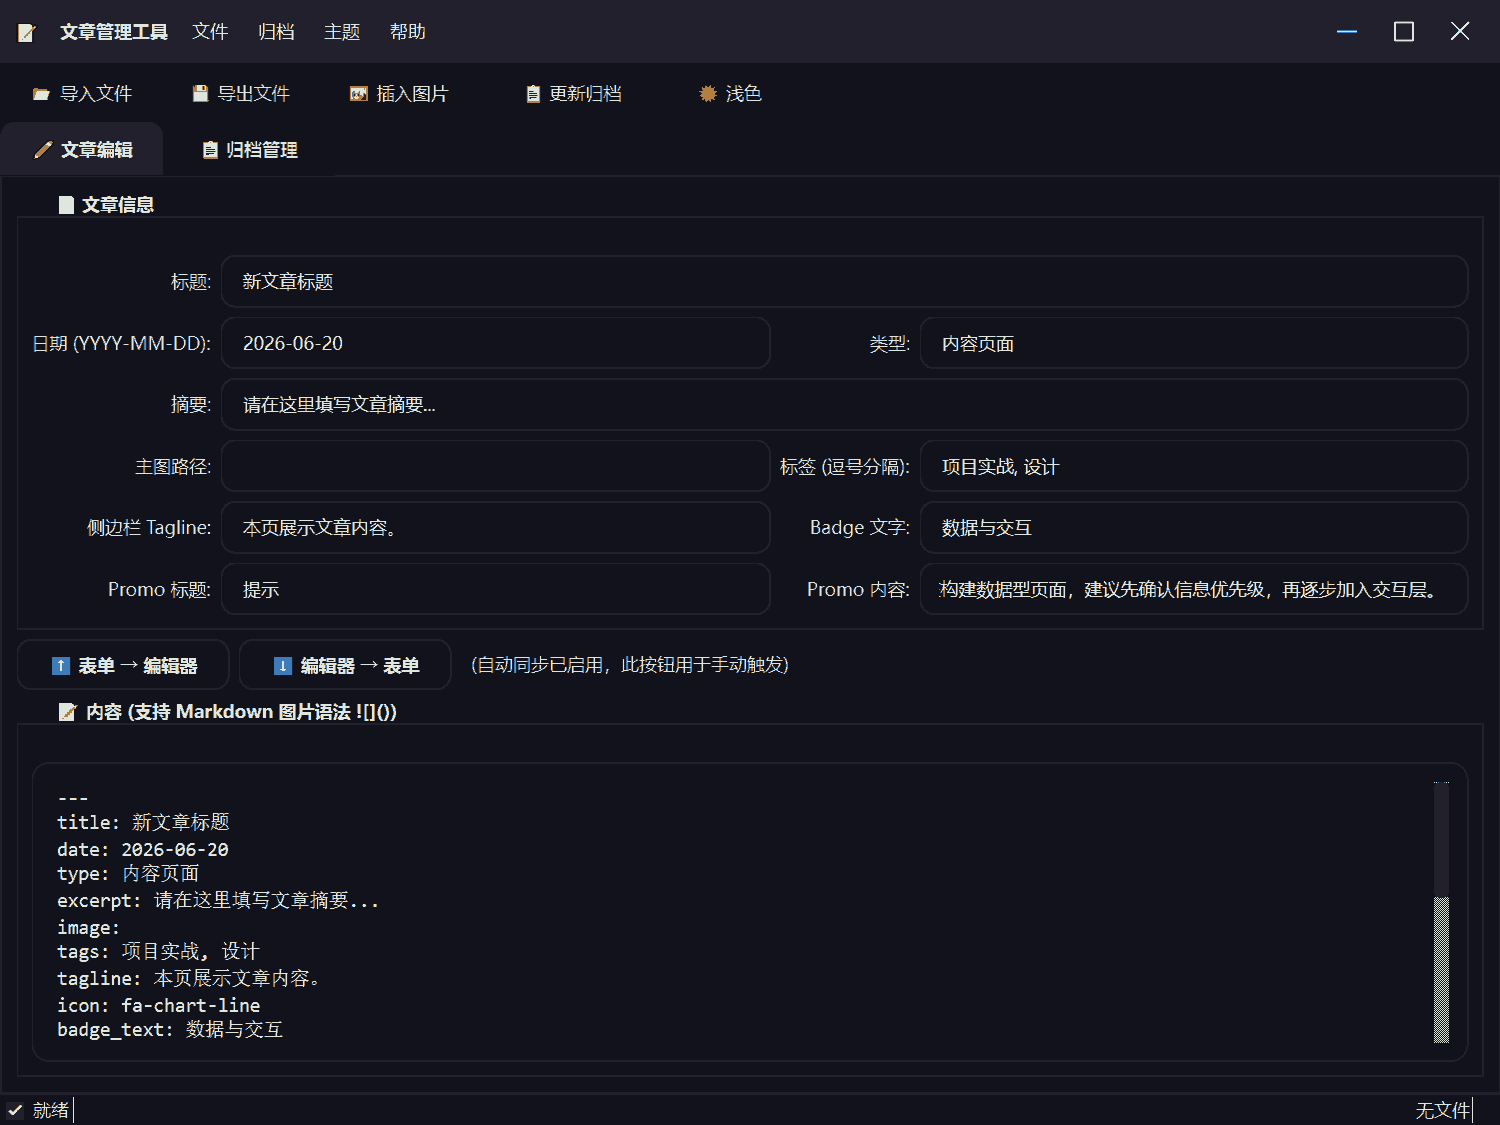
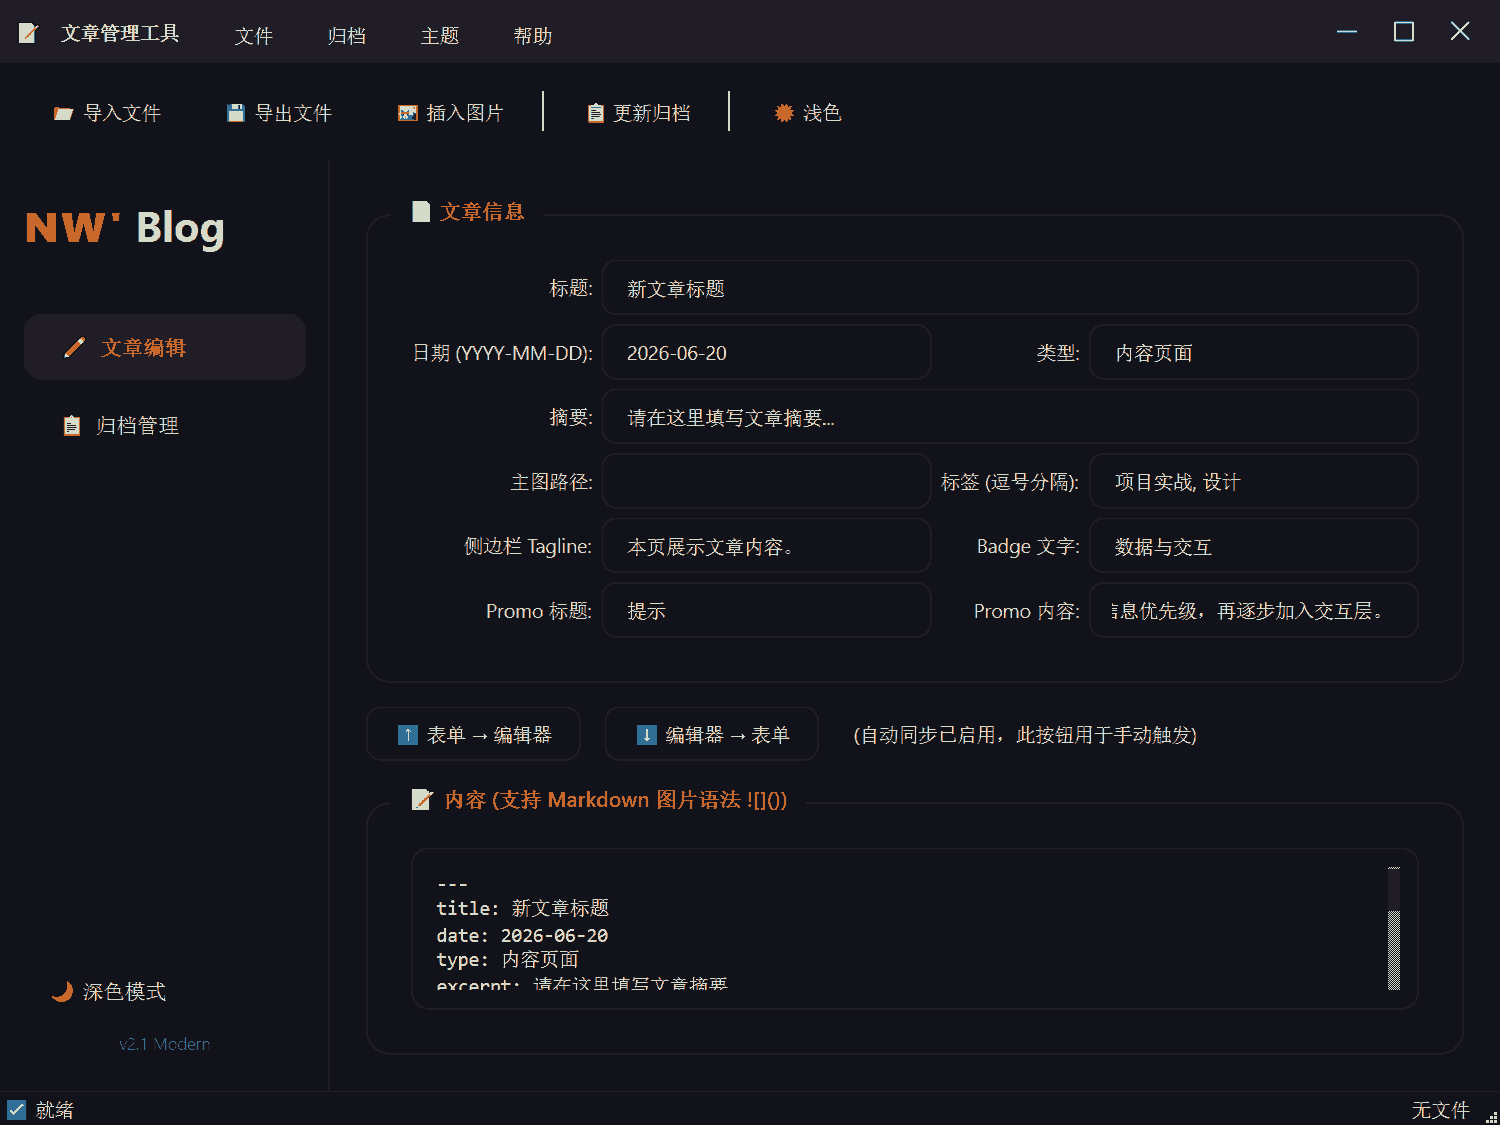
A (not-so) powerful desktop application that lets you easily write, manage, and publish blog posts. It supports Markdown writing, one-click export to HTML or Astro format, and automatically maintains the archive page.




Key Features
- WYSIWYG editing – Two-column layout: the form on the left manages the metadata, the Markdown editor on the right writes the body, with automatic two-way syncing.
- Powerful Markdown parsing – Supports Frontmatter containing special
characters (such as
<br>and->); the body is scanned line by line, so content is never lost. - Smart image handling – Uses the standard Markdown image syntax
<figure><img class="content-image" src="path" alt="description"><figcaption>caption</figcaption></figure>; when generating HTML it is automatically converted into a<figure>with a caption or a plain<img>. - Dual-format export – One-click export to HTML (a complete page) or an Astro component, with paths automatically adapted (relative / absolute).
- Archive management – A visual list shows all articles, supporting adding (auto-numbered) and deleting (entry + file).
- Customizable sidebar – Freely modify the title and content of the Promo area.
- Portable project – Images use
images/relative paths by default, making it easy to deploy to platforms like Vercel.
Installation & Getting Started
1. Requirements
- Python 3.8 or higher
- A virtual environment is recommended
2. Install dependencies
pip install beautifulsoup4 markdown lxml3. Run the tool
python article_tool.pyTip: Save
article_tool.pyunder any file name, and make sure it lives in the same directory as resource files such asstyles.cssandsite.js(or adjust the paths later).
Guide to the Core Features
Main interface layout
- Article info form: fill in the title, date, type, excerpt, hero image, tags, sidebar Tagline / Badge, and Promo title / content.
- Markdown editor: write the body text; supports standard Markdown syntax + the extended image syntax.
- Manual sync buttons:
Form → EditorandEditor → Form, for precisely controlling the sync direction (auto sync is enabled by default). - Toolbar: import HTML/Markdown, export Markdown, export article, insert image, update archive.
Article writing workflow
- Fill in the basic information (title, date, etc.).
-
Write the body in the editor, starting lines with
##for section headings. - Insert an image: click "Insert Image" in the toolbar, choose a file, and enter a description and a caption (caption optional).
-
Export the article: click "Export Article" or press
Ctrl+G, then choose the format (HTML or Astro) in the dialog that pops up. -
Update the archive: switch to the "Archive Management" tab, select
archive.html, and click "Add Current Article to Archive".
Complete Tutorial on the Article Writing Format
This tool is based on Markdown syntax and extends it with image handling. All standard Markdown syntax is supported; detailed explanations follow.
1. Headings (sections)
- Start a line with
##for a level-2 heading (i.e. a section of the article). - Each
##heading automatically generates a table-of-contents entry.
## Chapter One
This is the content of Chapter One...

## Chapter Two
This is the content of Chapter Two...
2. Images (important)
Syntax: <figure><img class="content-image" src="image path" alt="image description"><figcaption>caption</figcaption></figure>
Image description: the image'salttext, required.-
Image path: the relative or absolute path of the image;images/filenameis recommended. -
Caption: optional, wrapped in English double quotes. If present, the generated HTML shows the caption below the image; if omitted, only the image itself is shown.
Example:
<figure><img class="content-image" src="images/arch.png" alt="System architecture diagram"><figcaption>Figure 1 Overall architecture</figcaption></figure>
<img class="content-image" src="images/photo.jpg" alt="Image without caption">
Generated output (HTML):
- With caption: <figure><img src="images/arch.png" alt="System architecture diagram"><figcaption>Figure 1
Overall architecture</figcaption></figure>
- Without caption: <img src="images/photo.jpg" alt="Image without caption">
Note: the path defaults to
images/; in Astro mode it is automatically converted to/images/.
3. Font styles
| Style | Syntax | Example |
|---|---|---|
| Bold | **bold** | bold |
| Italic | *italic* or _italic_ | italic |
| Bold + italic | ***bold italic*** | bold italic |
| Strikethrough | ~~strikethrough~~ | |
| Underline | HTML tag <u>underline</u> | underline |
| Inline code | `code` | code |
4. Lists
Unordered list: start lines with -, +, or *.
- Item one
- Item two
  - Sub-item
Ordered list: start with a number followed by ..
1. Step one
2. Step two
   1. Sub-step
5. Links
External link: [link text](URL)
[GitHub](https://github.com) Internal links (pointing to other articles on this site):
- HTML mode: [article name](article1.html)
- Astro mode: [article name](/article1/)
Relative paths are recommended when writing the body. The tool does not automatically convert internal links, but you can adjust them manually to match the target format.
6. Code blocks
Wrap the content in three backticks ``` and optionally specify a language.
```python
print("Hello, World!")
```
7. Blockquotes
Start a line with >.
> This is a quoted line of text.8. Horizontal rules
Use three or more ---, ***, or ___ on a line of their own.
9. Escaping special characters
If you need to display symbols such as *, _, or #, put a backslash
\ in front of them, e.g. \*.
10. Supported HTML tags
Since this tool uses Python's markdown library with the
extra extension enabled, you can also insert the following HTML
tags directly into the body (without affecting Markdown parsing):
- <u> underline
- <mark> highlight
- <sub> / <sup> subscript / superscript
- <div> container (use with caution)
- as well as <figure> / <figcaption> etc. (but the image syntax is
recommended, since the tool generates it automatically)
11. Paragraphs and line breaks
- Separate paragraphs with a blank line.
-
If you need a forced line break (without starting a new paragraph), add two spaces at the
end of the line or use a
<br>tag (also usable in the Frontmatter).
12. Frontmatter (article metadata)
The beginning of the article must contain YAML-style fields wrapped in
---, used to control the page title, date, type, and so on. Example:
---
title: Blog Simple Page Editing Tool
date: 2000-01-01
type: Content Page
excerpt: Write blog posts the simple way with markdown — bye-bye, html!
image: images/wws.webp
tags: Project Practice, Design, BlogTool
tagline: This page displays the article content.
icon: fa-pen-fancy
badge_text: BlogTool
promo_title: Tip
promo_text: If you are building a data-driven page, confirm the information priority first, then gradually add the interactive layer.
---
See the "Article Info Form" section below for what each field means.
Article Info Form Field Descriptions
| Field | Description |
|---|---|
| Title | The article's main title, shown at the top of the page and in the browser tab |
| Date | Format YYYY-MM-DD, used for archive sorting and display |
| Type | Such as "Content Page", "Project Practice", etc.; shown in the meta line |
| Excerpt | Shown below the title; briefly introduces the article |
| Hero image path | Optional; shown below the excerpt as the header image |
| Tags | Comma-separated; shown in the "Popular Tags" area on the left |
| Sidebar Tagline | A short description in the left sidebar |
| Badge text | The badge text in the sidebar |
| Promo title | The title of the right sidebar promo box (default: "Tip") |
| Promo content | The content of the right sidebar promo box |
Export Format Comparison
| Feature | HTML | Astro |
|---|---|---|
| File extension | .html | .astro |
| Template type | Complete HTML page | Astro component (import BaseLayout) |
| Internal links | articleX.html | /articleX/ |
| Image paths | images/xxx | /images/xxx |
| Typical use case | Static site hosting (e.g. GitHub Pages) | Astro projects (e.g. deployed on Vercel) |
| Archive compatibility | Uses archive.html directly | Link formats must be adjusted manually (the tool does not convert them automatically) |
Recommendation: if you use this tool to manage the archive, keep
archive.htmlin HTML format and update it regularly.
Archive Management
The archive file (archive.html) is a standard HTML page containing a timeline list.
This tool provides the following operations:
- Select archive file: click the "Select Archive File" button and pick your
archive.html. - Refresh list: shows all archived articles (date, title, type).
- Add current article: automatically copies the current article's HTML to the archive
directory, inserts it into the timeline sorted by date, and auto-numbers it (
articleX.html). - Delete selected article: click an article in the list, then click "Delete Selected Article" to remove the archive entry and delete the corresponding HTML file.
Note: deletion cannot be undone — use with care.
FAQ
1. Why don't the images in the body display?
-
Check that the image paths are correct; relative paths like
images/filenameare recommended. -
Make sure the image files exist in the
images/folder. - After generating the HTML, if you open it in a browser, make sure the image paths are correct relative to the HTML file's location.
2. How do I customize the sidebar Promo?
- Edit "Promo title" and "Promo content" at the bottom of the article info form; they are automatically applied to the right sidebar on export.
3. How do I integrate the .astro files generated in Astro mode into my project?
-
Put the generated
.astrofile in thesrc/pages/directory (or the appropriate route directory); the tool recognizes the route automatically. Make sure your project has the dependencies such aslayouts/BaseLayout.astroandstyles.css.
4. Frontmatter parsing fails when importing Markdown?
-
Make sure the file starts with
---and that key-value pairs are separated by:(with a space after the colon). -
Values may contain
:and special characters; this tool's parsing is already optimized for that.
5. When inserting an image, the dialog inserts an images/ path — can I change it?
- Yes. After insertion, just edit the path in the editor manually; any relative or absolute path is supported.
6. How do I add more tags?
-
Separate them with English commas in the form's "Tags" field, e.g.
Project Practice, Design, BlogTool.
7. Are animated GIFs supported?
- Fully supported — just pick a GIF file. The syntax is the same and the generated HTML will display the animation properly.
8. Can I insert video or audio in the article body?
-
Yes — embed it directly using HTML
<video>or<audio>tags; Markdown leaves them as-is.
Tech Stack
- Python 3.8+
- Tkinter (GUI)
- BeautifulSoup4 (HTML parsing)
- Markdown (conversion)
- LXML (faster HTML parsing)
License
MIT License © 2026 NW
🤝 Contributing & Feedback
Issues and Pull Requests are welcome. If you run into any problems using the tool, you can contact the author (see the blog sidebar).
Happy Writing! 🎉